Why Does My Humidifier Have Mold? A Practical Troubleshooting Guide
Urgent, practical troubleshooting guide to diagnose and fix mold growth in humidifiers. Learn step-by-step cleaning, prevention, and safety tips to protect indoor air quality.

Mold growth in humidifiers usually starts with standing water and mineral buildup in the reservoir or wick. Start with a thorough clean of the tank, replace water daily, and dry all parts completely. If mold returns, inspect the wick, filter, and surfaces for damage and replace as needed.
Why mold happens in humidifiers
Mold growth in humidifiers is more common than many homeowners expect. The combination of moisture, warmth, and food particles from dust or mineral deposits creates a perfect habitat for mold spores to settle and multiply. The question many homeowners ask is why mold appears at all inside a small kitchen or bedroom unit. In this guide, we answer why does my humidifier have mold and provide practical steps to stop it for good. According to HumidifierBasics, mold growth is usually driven by three factors: residual standing water, mineral buildup that feeds biofilm, and insufficient drying after use. When these conditions persist, you’ll see fuzzy colonies on the reservoir, discoloration on the base, and a musty odor that signals airborne mold spores. HumidifierBasics analysis shows that even units kept on low humidity or used with essential oils can still develop biofilms if cleaning is neglected. Therefore, the first line of defense is a disciplined cleaning routine, a habit that protects your family from allergies and respiratory issues. The good news is that mold in humidifiers is largely preventable with simple, consistent maintenance and proper water choice.
Common mold growth patterns in humidifiers
Mold in humidifiers tends to appear in predictable places, regardless of the brand or model. In reservoir-based or ultrasonic units, mold often starts as slimy or fuzzy growth along the waterline, inside the tank walls, or around any detachable lid where moisture lingers. In wick-based or evaporative designs, the mold may take root on the wick itself, inside the filter housing, or at the interface between the water reservoir and the base. Mineral deposits from tap water create a food source for biofilm, especially when cleaning is infrequent. A musty smell or visible discoloration on plastic surfaces is a clear sign you’re dealing with a mold issue. Understanding these patterns helps you target cleaning efforts without wasting time on sections that are unlikely to harbor mold. Different humidifier types require tailored strategies, but the core principle remains: remove moisture, remove organic matter, and prevent rewetting without drying out the components. HumidifierBasics notes that even subtle microbial growth can worsen indoor air quality, so early intervention matters for families with allergies or asthma.
How to diagnose the mold source in your unit
Diagnosing the exact mold source starts with a careful inspection of each component. Begin with the reservoir—look for soft, discolored film, slimy residue, or powdery mineral crusts around the waterline. Next, examine any removable filters or wicks, noting if they feel damp, stiff, or discolored. Don’t forget the base cavity and the fan housing; mold can linger in crevices where airflow slows. Smell is also informative; a persistent musty odor usually indicates a biofilm layer that can release spores during operation. If you use essential oils or additives, consider whether residues are contributing to surface films. For a quick assessment, wipe a small test area with a cloth dampened with white vinegar; if discoloration fades, you likely have mineral/biofilm buildup rather than a hard-coated mold colony. This process aligns with advice from HumidifierBasics Analysis, 2026, and will help you decide whether a thorough cleaning, part replacement, or unit disposal is warranted.
Step-by-step cleaning and preventative routine
A disciplined cleaning routine is the cornerstone of preventing mold. The steps below synthesize practical, field-tested methods for most home humidifiers. First, unplug and disassemble the unit. Empty any remaining water and discard it. Then, rinse all removable parts with warm water and allow them to air-dry. Prepare a cleaning solution using distilled water and white vinegar (or the cleaner recommended by the manufacturer). Soak reservoir components for 20-30 minutes, scrub crevices with a soft-bristled brush, and wipe the outer shell. Rinse thoroughly with clean water to remove all vinegar or cleaner traces. Dry all parts completely before reassembly to prevent re-wetting. Reassemble and run a short cleaning cycle with plain water to ensure no residue remains. Finally, establish a daily water-change habit and a weekly deep-clean schedule. Pro tip: Always use distilled or demineralized water to minimize mineral buildup that feeds mold. Safety note: never mix cleaning solutions with bleach unless the manufacturer explicitly approves it; follow the dilution instructions and rinse thoroughly.
When to replace parts or the whole unit
If you consistently see mold after cleaning, inspect for wear in the wick, filter, or seals. Worn components can harbor biofilms that recur even after cleaning. Replace the filter or wick according to the manufacturer’s schedule, and consider upgrading to a model with simpler, more accessible parts for cleaning. If mold persists across cycles and after replacing primary wear parts, the unit’s interior may have irreparable cracks or microgrooves that trap moisture; in such cases, replacing the humidifier is often the safer option. This decision shape aligns with practical maintenance guidelines and HumidifierBasics Team recommendations.
Safety considerations and when to call a pro
Mold in humidifiers can affect indoor air quality, especially for people with allergies, asthma, or compromised immunity. Always unplug the device before disassembly, use gloves, and work in a well-ventilated area when cleaning with cleaners. Do not mix cleaners that release chlorine gas or ammonia; never use abrasive tools on fragile plastics. If you notice persistent health symptoms or extensive mold growth that you cannot safely remove, seek professional help or contact the manufacturer for guidance. For complex units or if there is water damage to nearby surfaces, a professional assessment is warranted. HumidifierBasics emphasizes safety first and recommends replacing the unit if structural damage is evident or if repeated mold growth occurs despite proper cleaning.
Preventing mold long-term: daily and weekly routines
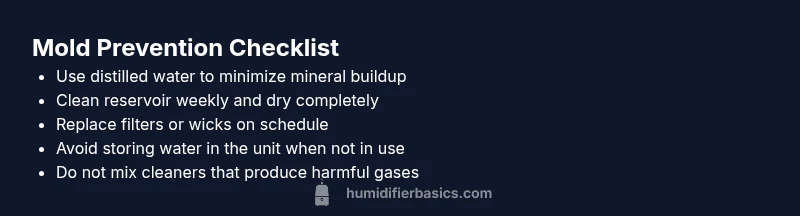
Prevention is easier than remediation. Daily, empty and refill the humidifier with clean water, rinsing the reservoir to remove standing moisture. Weekly, perform a deeper clean using a manufacturer-approved cleaner, scrub hard-to-reach areas, and air-dry all parts completely. Use distilled water to minimize mineral buildup, and replace filters or wicks on schedule. Maintain a moderate humidity level to prevent condensation on surfaces, which can sustain mold growth. Finally, store the unit dry if you won’t use it for an extended period. By sticking to this routine, you reduce the likelihood of mold returning and preserve healthier indoor air quality.
Quick-reference troubleshooting checklist
- Inspect reservoir for visible mold and mineral crusts
- Empty and rinse water daily; dry parts completely
- Switch to distilled water to minimize mineral buildup
- Check filters and wicks; replace if discolored or damp
- Use manufacturer-approved cleaners; never mix with ammonia
- Run a short rinse cycle after cleaning to verify no residue remains
Steps
Estimated time: 60-90 minutes
- 1
Power off and unplug
Power down the unit and unplug it before disassembly. Remove any water and take note of how parts fit together so you can reassemble correctly. Wear gloves and safety glasses if you’re cleaning with cleaners.
Tip: Keep small parts in a labeled container to avoid misplacing them. - 2
Disassemble and rinse
Carefully remove the reservoir, lid, wick/filter (if applicable), and base housing. Rinse each part under warm running water to remove loose debris. Avoid using hot water on plastic parts if the manufacturer warns against it.
Tip: Place parts on a clean towel to prevent contamination. - 3
Prepare cleaning solution
Mix a cleaning solution: distilled water with white vinegar (or manufacturer-approved cleaner) in the recommended ratio. Soak reservoir parts for 20–30 minutes to loosen biofilm. Avoid harsh chemicals that could damage the plastics.
Tip: Vinegar is effective for mineral buildup but ensure thorough rinsing to remove residual scent. - 4
Scrub and rinse
Scrub all surfaces with a soft brush, focusing on corners and grooves where biofilm hides. Rinse until there’s no odor or residue left. Inspect seals and gaskets for wear.
Tip: Do not use abrasive pads that could scratch surfaces. - 5
Dry and reassemble
Dry every component completely before reassembling. Reassemble the unit per the manual, ensuring seals are snug and the water reservoir is secure.
Tip: Drying prevents immediate mold re-growth when you power it back on. - 6
Test run and maintain
Plug in, fill with clean water, and run a short cycle to ensure everything operates smoothly. Establish a cleaning cadence—daily water changes and weekly deep cleans.
Tip: Set reminders to keep up with maintenance.
Diagnosis: Visible mold growth or musty odor from the humidifier, even after basic cleaning.
Possible Causes
- highStagnant water in the reservoir or tank
- mediumMineral buildup that feeds biofilm on surfaces
- lowDirty wick or filter providing a food source for mold
Fixes
- easyDisassemble and clean with a vinegar solution, rinse thoroughly, and dry completely
- easyReplace filters/wicks and switch to distilled water to minimize mineral deposits
- easyRun a manufacturer-recommended deep-clean cycle and ensure full drying before storage
FAQ
Is mold in a humidifier dangerous to health?
Yes. Mold can irritate airways and trigger allergies or asthma symptoms, especially in sensitive individuals. Prompt cleaning reduces exposure and improves indoor air quality.
Yes. Mold in humidifiers can irritate airways and trigger allergies, so fix it promptly to protect your health.
Can I use bleach to clean my humidifier?
Bleach can be effective if used exactly as instructed and thoroughly rinsed afterward. Never mix with ammonia or vinegar, and avoid overuse on plastics.
Bleach can work if used as directed and thoroughly rinsed; avoid mixing with other cleaners and rinse well.
How often should I clean my humidifier to prevent mold?
Aim for a quick daily rinse with fresh water, plus a thorough weekly cleaning. Increase frequency if you operate it in a humid climate or have mineral-rich water.
Clean it daily with fresh water and do a deeper clean weekly; more often if you notice buildup.
Should I replace the humidifier if mold keeps returning?
If mold recurs despite proper cleaning and part replacement, the unit may be structurally damaged. Replacing the humidifier is often the safer choice.
If mold comes back after proper cleaning and part changes, consider replacing the unit for safety.
What water type is best for mold prevention?
Distilled or demineralized water is best. It minimizes mineral deposits that can feed mold and biofilm, reducing cleaning frequency.
Distilled water is best to prevent mineral buildup and mold growth.
Does mold form differently in ultrasonic vs evaporative humidifiers?
Mold growth can occur in both types. Ultrasonic units may disperse smaller droplets that spread mold faster; evaporative units rely on wicks that can trap mold. Regular cleaning is essential for all.
Mold can grow in both types; keep up with cleaning and drying to prevent it.
Watch Video
The Essentials
- Clean and dry all parts after each use.
- Use distilled water to minimize mineral buildup.
- Replace worn filters or wicks on schedule.
- If mold persists after cleaning, consider replacing the unit.