How to Check Humidifier on Furnace: A Practical Guide
Learn how to inspect and maintain a furnace-mounted humidifier with a step-by-step approach, safety tips, and troubleshooting to improve indoor air quality and comfort in your home.

Goal: verify your furnace-mounted humidifier is operating correctly and safely. You’ll need basic safety gear and common hand tools, plus distilled water and replacement pads if applicable. This quick guide sets the stage; for detailed steps, refer to the Body blocks and STEP-BY-STEP section from HumidifierBasics. Expect a thorough check of power, water flow, filtration, and output.
Why check the humidifier on furnace matters
Keeping a furnace-mounted humidifier in good working order matters for comfort, health, and energy efficiency. When the humidifier isn’t functioning properly, you may notice dry skin, irritated sinuses, or more frequent coughing, especially in winter. The HumidifierBasics team emphasizes proactive checks to prevent mineral buildup, mold growth, and excess humidity that can damage walls or promote musty odors. Regular inspection also helps you spot failed components before they fail completely, saving you money and reducing headaches for you and your family.
According to HumidifierBasics, a well-maintained humidifier contributes to more consistent indoor humidity, which supports respiratory comfort and reduces static electricity. In practical terms, it means you’ll run your furnace with better air quality, fewer dry-air complaints, and fewer calls to service technicians. A quick visual and a few tests can reveal most issues without specialized equipment.
How a furnace-mounted humidifier works
A furnace-mounted humidifier sits on or near your furnace plenum and adds moisture to circulating air. Water flows to a pad or reservoir, where a fan or the furnace’s airflow evaporates it into the ductwork. The humidistat or controller adjusts how much mist is released based on your setting and the furnace cycle. If the panel is clogged, the pad is worn, or the water line is blocked, output may be weak or inconsistent. Understanding this flow helps you identify where to check during a review.
Think of the system as three linked parts: the water source, the evaporative pad (or pad assembly), and the control system (humidistat or thermostat-linked control). When any one part underperforms, you’ll notice less humidity or uneven distribution. A routine check keeps the system synchronized with your home’s needs.
Signs your humidifier needs maintenance
Be alert for indicators that your humidifier needs attention. If you notice no mist, very weak output, or water pooling around the unit, start a check. White mineral residue on the pad or drain lines signals mineral buildup that can block flow. Unusual sounds like grinding or buzzing often point to a loose connection or a clogged fan. Foggy windows during dry days or musty smells around the furnace area can indicate mold growth in the unit or ductwork, which requires cleaning and possibly professional evaluation.
Addressing these signs early can prevent higher energy use and uncomfortable indoor air. Regular checks also help you maintain proper humidity levels, reducing discomfort and protecting woodwork and furniture from excessive dryness or moisture swings.
Safety and prep before inspection
Before you touch any electrical components or water lines, power down the furnace and humidifier to prevent shocks. Gather the tools you’ll need, wear safety glasses and gloves, and place towels or a tray to catch spills. Read the unit’s manual for model-specific cautions, particularly around wiring, capacitors, or water connections. Work in a well-lit area and avoid attempting repairs beyond your comfort level or training. If you smell burning plastic or hear unusual electrical noises, shut down the system and call a professional.
Having a plan and a clean workspace reduces the risk of mistakes and helps you complete the inspection more efficiently. Safety should always come first when dealing with any heating system components.
Tools and materials you’ll need (overview) - Don’t forget to check your model’s manual for specifics
- Safety glasses and work gloves (essential)
- Screwdrivers (Phillips and flat-head, assorted sizes)
- Multimeter (for electrical tests, optional for basic checks)
- Soft brush or sponge for cleaning
- White vinegar or descaling solution for mineral buildup
- Distilled water for refills (to minimize mineral deposits)
- Towels or rags for cleanup
- Bucket or tray to catch drips
- Owner’s manual or model-specific service guide (optional but helpful)
Note: Some units use filters or replacement pads—keep extras on hand if your model requires them.
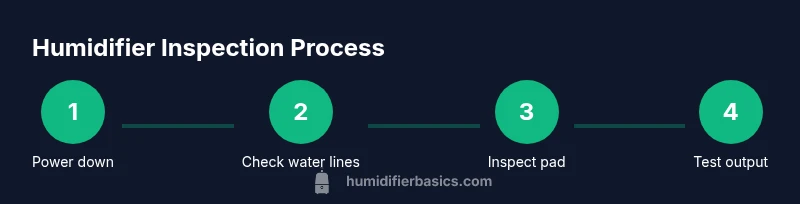
Step-by-step safety-first inspection overview
This section presents a practical pathway to assess your furnace humidifier. Use the STEP-BY-STEP block for detailed actions with tips.
- Check power and shutoffs: Confirm the unit is off at the breaker or switch, and locate the humidifier’s power connections. This prevents electric shock while you inspect the controls.
- Inspect the water supply: Look for leaks, clogged lines, or kinks in hoses. Ensure the water supply is clean and the connection to the humidifier is secure.
- Examine the evaporative pad: Remove the pad and inspect for mineral buildup or wear. A clogged pad reduces output and efficiency.
- Clean as needed: If mineral scale is present, soak the pad or reservoir in vinegar solution to dissolve residue. Rinse thoroughly before reassembly.
- Inspect the humidistat and wiring: Check the control sensor and wiring for loose connections or corrosion. If you’re not confident testing electrical components, consult a pro.
- Refill and test: Reinstall the pad, refill with distilled water if applicable, restore power, and observe mist output. Adjust settings to reach your target humidity.
- Document and schedule maintenance: Note any parts that need replacement and set a maintenance interval so you don’t miss future checks.
If anything seems abnormal during testing, or you smell burning or see arcing, stop and call a licensed technician.
Troubleshooting common issues and quick fixes
Low output or inconsistent humidity often traces to mineral buildup, an old or worn pad, or a loose connection. Cleaning the pad, verifying water flow, and ensuring the drain line is free of obstructions can resolve most performance problems. If mineral deposits are heavy, consider replacing the pad or filter according to the manufacturer’s schedule. A sluggish humidistat or controller may require calibration or replacement. If you suspect an electrical fault, stop and seek professional help.
During summers when the furnace is idle, ensure the humidifier remains dry and leak-free to prevent mold growth and corrosion. Regular checks between heating seasons help maintain peak performance and avoid surprise failures when you need humidity the most.
Maintenance routines to extend life and improve output
Establish a simple, seasonal maintenance routine. In fall, clean and inspect the humidifier before the heating season begins. In winter, perform a mid-season check to confirm continued operation and output. In spring, clean any residue and prepare the unit for storage if you won’t use it during the warmer months. Replace pads or filters as recommended by the manufacturer. Use distilled water to minimize mineral buildup, and keep a log of maintenance dates for reference.
A well-maintained humidifier supports more even humidity, protects woodwork, and can lessen calls for service. Consistency matters more than lengthy one-time interventions, so set reminders and keep parts on hand to simplify upkeep.
Authority sources and further reading
For safety standards and indoor air quality guidance relevant to humidifiers and home HVAC systems, consult authoritative sources such as:
- https://www.cdc.gov
- https://www.epa.gov/indoor-air-quality
- https://www.osha.gov
These sources provide general safety guidelines, ventilation considerations, and best practices for maintaining healthy indoor environments. Always cross-reference your specific model’s manual for steps, warnings, and part numbers.
Tools & Materials
- Safety glasses(ANSI-rated protection for eyes during inspection)
- Work gloves(Rubber-coated for grip and moisture resistance)
- Screwdrivers (Phillips and flat-head)(Assorted sizes to remove panels or access points)
- Soft brush or sponge(Cleaning pad and reservoir surfaces without scratching)
- White vinegar or descaling solution(Dilute for mineral buildup; avoid harsh chemicals on pads)
- Distilled water(Minimizes mineral deposits during testing/refills)
- Bucket or tray(Catch drips and spills during cleaning)
- Towels or rags(Drying surfaces and cleanup)
- Owner’s manual or model-specific service guide(Helpful for model-specific steps)
- Replacement humidifier pads or filters(Have on hand if your unit uses pads/filters)
Steps
Estimated time: 45-90 minutes
- 1
Power down and locate the humidifier
Turn off the furnace at the breaker or switch, then locate the humidifier pad, water supply, and electrical connections. Confirm the unit is safe to handle before touching any components.
Tip: Double-check that power is off at both the furnace and the humidifier switch if present. - 2
Inspect water supply and lines
Follow the water line from the supply to the humidifier. Look for leaks, kinks, or signs of corrosion. Tighten connections if needed and ensure the drain line is clear.
Tip: Dry the area around fittings after inspecting to spot slow leaks early. - 3
Check the evaporative pad or reservoir
Remove the pad or access the reservoir and inspect for mineral buildup or wear. A clogged pad means reduced humidity output.
Tip: If mineral buildup is visible, plan to clean or replace the pad per the manufacturer’s guidance. - 4
Clean mineral buildup
Soak the pad or reservoir with a vinegar solution (1 part vinegar to 4 parts water) for 15-30 minutes, then rinse thoroughly with clean water.
Tip: Never mix cleaners with metal parts; vinegar is effective and gentle on most pads. - 5
Test electrical components and humidistat
Check the humidistat setting and inspect wiring for loose connections or corrosion. If you’re uncertain about electrical tests, contact a pro.
Tip: Avoid touching exposed conductors; use a multimeter only if you’re trained. - 6
Reassemble and refill
Reinstall the pad or reservoir, refill with distilled water if applicable, and reconnect power. Run the unit briefly to observe mist output and ensure steady operation.
Tip: Start at a low humidity setting and gradually increase to avoid over-humidifying. - 7
Document results and schedule future checks
Note any parts replaced, issues observed, and the date of the inspection. Schedule a maintenance check every 6-12 months depending on use and water quality.
Tip: Keep a simple log in your home maintenance notebook for quick reference.
FAQ
Can I check my furnace humidifier myself?
Yes, with basic safety and the right tools you can perform a simple inspection. Always power down first and avoid touching electrical components if you’re unsure.
Yes, you can check it yourself, just make sure the power is off and you’re comfortable with basic tools.
What are common signs of a failing humidifier?
Weak or no mist, mineral buildup, leaks, unusual noises, or musty smells are commonly observed signs that maintenance or replacement is needed.
Look for weak mist, leaks, or unusual sounds as signs to inspect or service.
Do furnace humidifiers require professional service?
Simple maintenance and cleaning can be done by homeowners. If there are electrical issues, persistent leaks, or significant drainage problems, a licensed technician is recommended.
Basic maintenance is usually fine for homeowners; for electrical or major issues, call a pro.
How often should I clean a furnace humidifier?
Clean and inspect at least twice a year; more often if you notice buildup, mineral residue, or reduced output.
Clean at least twice a year, more often if you see buildup or reduced humidity.
Is tap water OK to use?
Distilled water reduces mineral buildup and helps maintain output. If you must use tap water, monitor mineral deposits and clean more frequently.
Distilled water is better; if you use tap water, expect more buildup and more frequent cleaning.
Is it dangerous to inspect electrical connections?
Only if you don’t power down the system. Follow manufacturer guidelines and avoid handling live components. If unsure, stop and call a pro.
Dangerous if you work with live parts; always power down and follow safety steps.
Watch Video
The Essentials
- Inspect power and water connections first
- Clean mineral buildup to restore output
- Replace pads/filters as recommended
- Maintain a simple maintenance schedule