Humidifier Not Working: A Practical Troubleshooting Guide
Struggling with a humidifier that won’t run? This urgent, practical guide walks you through power, water, and maintenance fixes to get your humidity back to healthy levels.

Most humidifier malfunctions come from simple power or setup issues. First, confirm the unit is plugged in and the outlet works, then reseat the water tank and ensure the switch is on. If it still won’t run, inspect the filter or wick for clogs and perform a quick reset. When unsure, consult the user manual.
When the humidifier is not working: first checks
According to HumidifierBasics, many cases where a humidifier is not working stem from straightforward, user-fixable issues rather than a faulty motor. Start with non-technical checks you can do in minutes: verify the unit is plugged in, confirm the outlet is live (try another device in the same outlet), ensure the water tank is seated correctly, and check that the power switch is in the ON position. If any of these aren’t correctly set, the device won’t start or will fail to emit mist. Also inspect the tank cap and safety interlocks — misalignment here is a common cause of a non-responsive unit. Keep notes of what you tested; this will inform whether you can fix it yourself or need service later.
Safety-first checks you can do without tools
Unplug the humidifier before any inspection. Keep water away from electrical components, and avoid attempting repairs if you notice frayed cords or damaged housings. Use a dry, clean surface to inspect the water tank seating, valve seals, and any removable parts. If your water is hard, mineral buildup can affect performance; in that case, plan a thorough cleaning. When in doubt, move the device to a safe, level area and consult the manual for safety interlocks and disassembly cautions. Humidifier safety is not optional—prioritize it to prevent shocks or leaks.
Common culprits: power, water, and airflow
Most failures fall into three buckets: (1) power and power supply issues, (2) water delivery problems, and (3) airflow restrictions. A loose power plug, tripped breaker, or switched-off outlet can stop mist production. A tank that’s not filled to the minimum line, or a tank not seated properly, will starve the mechanism of water. Dirty filters or clogged air intake reduce or stop mist. HumidifierBasics notes that clean, well-seated components are usually enough to restore operation. If you detect unusual odors, inspect for mold growth or mineral dust and treat accordingly.
How to test the power supply and outlet safely
Always unplug before testing. Try a known-good outlet or swap the plug to a different cord if you have one. If the device won’t power on in multiple outlets, the issue could be the power switch, a blown fuse, or an internal fault. Check the outlet with another small appliance to confirm it supplies power. If the outlet is fine, the humidifier may need internal service. Avoid using extension cords for high-wattage devices, as they can trip or overheat.
Cleaning and maintenance basics you should perform now
Regular cleaning prevents mineral buildup and microbial growth that can impede airflow and whisper-quiet operation. Empty the tank, rinse with clean water, and wipe down the interior and the base. Soak filters or Wicks per the manufacturer’s schedule, then rinse thoroughly and let dry completely before reinstalling. If you notice white dust around the unit, use distilled water to minimize mineral residue. Maintenance now saves future headaches.
Diagnostic flow you can follow (quick map)
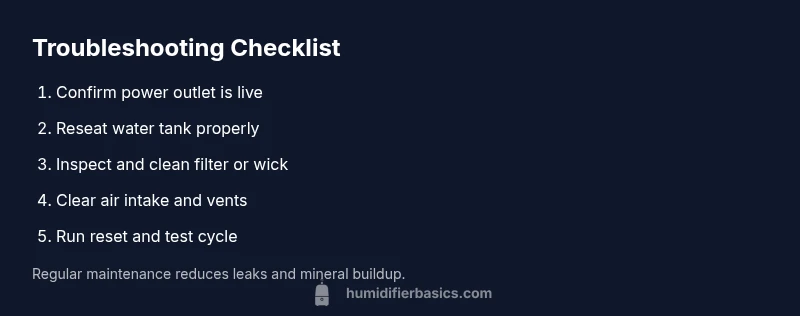
If you see no mist or the unit won’t start, run through a simple flow: (1) power + outlet check, (2) tank seating and water level, (3) filter/wick cleanliness, (4) air intake clearance, (5) set interlocks properly, (6) power cycle/reset. Each step narrows possibilities without disassembly. If no fix after these steps, the fault may be electrical or mechanical and requires professional assessment.
Step-by-step fixes for the most common fault (hands-on)
Follow these fixes in order to resolve the most frequent issues quickly. Start with safe, easy steps and proceed to more involved tasks if needed. Always unplug before handling internal components and consult the manual for model-specific procedures. If you’re unsure at any point, pause and contact support to avoid damage or safety risks.
Maintenance to prevent future problems
Schedule regular cleanings and filter changes aligned with your usage and water quality. Use distilled water where possible to minimize mineral buildup. Keep your humidifier away from heat sources and direct sunlight to prolong parts life. Document any changes in performance so you can notice when a component is nearing end-of-life.
When to call a professional and warranty considerations
If the humidifier continues to fail after completing the basic checks and maintenance, and you suspect an internal motor, PCB, or seal issue, seek professional service. If the device is under warranty, contact the manufacturer or authorized service center first to avoid voiding coverage. Capture photos of the unit and note any error indicators to speed up diagnosis.
Steps
Estimated time: 45-60 minutes
- 1
Power check and safety
Unplug, inspect the power cord, and plug into a known-good outlet. Flip the switch and listen for any indicator lights. If the outlet is dead, fix the circuit before testing further.
Tip: Always use a grounded outlet and dry hands. - 2
Inspect water tank seating
Remove the tank, inspect the seal and gasket for damage, reseat firmly, and reattach. Ensure water level is above the minimum line.
Tip: A loose tank is a common reason for no mist. - 3
Check and clean the filter/wick
Remove the filter or wick and inspect for clogs, mold, or tears. Clean with mild detergent or replace if degraded. Reinstall after drying.
Tip: If your model uses a disposable filter, replace rather than clean. - 4
Inspect air intake and vents
Clear any dust or debris from air intake grills and vents. A blocked airflow reduces mist output and can trigger safety shutoffs.
Tip: Use a soft brush to avoid damaging fins. - 5
Reset and test run
Reconnect power, set to the default humidity level, and run for 5–10 minutes. Observe for mist and listen for motor hum. If nothing happens, stop and move to deeper checks.
Tip: Refer to the manual for the reset procedure specific to your model. - 6
Reassemble and final test
Reinstall all parts, fill tank, and run the unit for 10–15 minutes in a calm room to confirm stable operation.
Tip: Keep the unit on a stable, level surface away from children.
Diagnosis: Humidifier won't start or produce mist
Possible Causes
- highPower issue (unplugged, faulty outlet, switched off)
- mediumWater tank not seated or empty
- mediumClogged filter, wick, or intake
- lowSafety interlock engaged due to improper assembly
- lowInternal motor or PCB fault
Fixes
- easyPlug unit in and test a known-good outlet; try a different outlet
- easyReseat the water tank and fill to recommended level
- easyClean or replace filter/wick per manual; rinse intake ports
- easyReassemble according to manual to clear safety interlocks
- hardIf no fix, contact service or warranty for diagnosis
FAQ
Why won’t my humidifier turn on?
Most often power, outlet, or tank seating issues. Verify the outlet works, the switch is on, and the tank is properly seated. If it still won’t power, check for a blown fuse or tripped breaker.
First check the power and tank seating. If it still won’t turn on, test the outlet and breaker.
Why is there no mist even when it runs?
Low water level, a clogged wick, or dirty intake can stop mist. Refill to the proper level, clean or replace the wick, and clear any debris from the intake.
Check water level and clean the wick; ensure the intake is clear.
Why is my humidifier leaking water?
Leaks usually indicate a loose tank, cracked housing, or faulty seals. Empty the unit, reseat the tank, and inspect gaskets; replace seals if damaged.
Inspect seals and tank fit; reseat the tank carefully.
How often should I replace the filter or wick?
Most models need filter/wick replacement every 1-3 months depending on use and water quality. Follow the manufacturer’s schedule and indicators.
Replace filters every 1-3 months, or as advised by the manual.
Is it safe to use distilled water?
Yes. Distilled water reduces mineral buildup and white dust and is generally recommended for most humidifiers.
Yes—distilled water helps prevent mineral buildup.
When should I call a professional?
If the unit still won’t operate after basic fixes, or you hear unusual noises or smells, seek professional service or check warranty coverage.
If it still won’t run after basic fixes, call a pro.
Watch Video
The Essentials
- Test power and outlet first.
- Ensure tank seating and water level are correct.
- Clean or replace filters regularly.
- Follow a safe reset and diagnostic flow.
- Call a pro if the fault persists after basics.