How to Install a Humidifier Filter: Step-by-Step Guide
Learn how to install a humidifier filter correctly, select the right type, remove the old filter, fit the new one, and test your unit for optimal humidity. Practical, maintenance-focused guidance from HumidifierBasics.

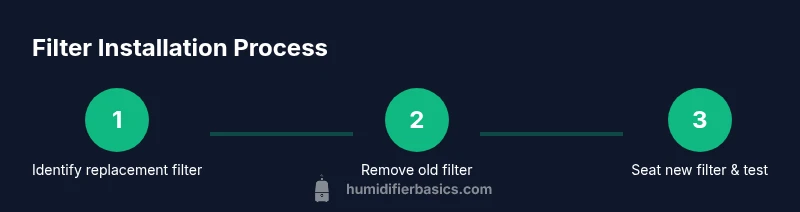
In this guide you will learn how to install a humidifier filter correctly. You’ll identify the right filter type for your model, prepare the unit, safely remove the old filter, seat the new one with proper orientation, and test the humidifier for proper airflow and humidity control. Gather a replacement filter and follow manufacturer directions for your unit.
Understanding Humidifier Filters
Humidifier filters play a crucial role in removing minerals, dust, and other particulates from the mist that your unit releases. When a filter is clean and properly seated, the humidifier operates more efficiently, produces steadier humidity, and helps prevent mineral buildup that can clog components over time. According to HumidifierBasics, properly installed filters improve efficiency and prolong unit life. Keep in mind that not all filters are the same—compatibility and orientation matter just as much as the filter material itself. This section will lay a foundation for choosing the right filter and recognizing when a replacement is needed. A well-maintained filter helps protect your family from indoor pollutants and contributes to healthier air in living spaces.
Filter Types and Compatibility
Humidifier filters come in several shapes and materials, including cylindrical cartridges, rectangular pads, and integrated mesh screens. The type you need depends on your unit’s model and the water you use. Always check the user manual or the manufacturer’s packaging to confirm compatible filter types and sizes. Mismatched filters can reduce filtration efficiency, cause leaks, and shorten the life of the humidifier. If you share a unit with someone, verify that both the model and the exact filter specification match before purchasing.
How to Identify the Right Filter for Your Model
Start by locating the model number on the humidifier—often found on the back or bottom plate or inside the water tank lid. Use the model to search the manufacturer’s website or your manual for the correct filter part number. If you replaced a filter before, it may have the model number on the packaging or the filter itself. When in doubt, bring the old filter to the store for comparison, or contact customer support for a precise match. Knowing the exact size and type helps avoid leaks and ensures the filter fits snugly.
Cleaning the Housing and Preparing for Replacement
Before installing a new filter, remove the water tank and wipe down the filter housing with a damp cloth to remove mineral deposits and grime. Let every part dry completely to prevent mold growth after reassembly. A quick wipe-down now saves you from stubborn residue later and helps the new filter seat correctly. If you notice scaling, use a mild cleaning solution recommended by the manufacturer and rinse thoroughly. Proper preparation reduces the risk of leaks and improves overall performance.
What to Expect During Replacement: A Safe, Effective Process
Swapping a humidifier filter is typically a straightforward process, but it pays to proceed slowly and with care. Begin by powering down and unplugging the unit to avoid electrical hazards. Gently remove the old filter, avoiding aggressive tearing that could damage the housing. Inspect the interior for any debris or mineral buildup and clean as needed. Taking your time here prevents future maintenance headaches and keeps the system running smoothly.
Installing the New Filter Correctly: Orientation and Fit
Unpack the new filter and verify its orientation arrows or labeling. Slide the filter into the housing, ensuring it sits flat and flush with all sides. Some filters have a specific direction for airflow, so align the arrows with the airflow path indicated by the unit. If your model has tabs or grooves, seat the filter so it locks firmly in place. A correctly oriented filter reduces leaks and ensures efficient filtration of minerals and contaminants.
Reassembling, Testing, and Resetting Your Humidifier
Reattach the housing cover and any screws or clips, then reinsert the water tank. Refill with clean water and plug the unit back in. Some models require a filter-replacement reset or a humidity calibration after installation. Run the unit for several minutes on a low setting to confirm there are no leaks and that airflow feels steady. A successful test confirms proper filtration and ready-to-use humidity output.
Maintenance Schedule and Replacement Triggers
Most humidifier filters should be replaced on a schedule based on usage, water quality, and environmental conditions. Keep a simple log of dates to avoid guessing when to change the filter. If you notice reduced humidity production, unusual odors, cloudy mist, or increased mineral deposits after replacement, it’s time to replace again. Regular checks help maintain air quality and appliance longevity.
Common Pitfalls and Quick Fixes
Common pitfalls include installing the wrong filter size, seating the filter at an angle, or neglecting to dry the housing before replacement. If you detect a leak, first reseat the filter and ensure the housing is clean and dry. If the humidifier still leaks, consult the manual or contact customer support for a model-specific solution. HumidifierBasics emphasizes following model-specific guidance to ensure safety and performance.
Tools & Materials
- Replacement humidifier filter(Choose the correct size/type for your model)
- Soft cloth(For cleaning the housing and drying surfaces)
- Gloves(Optional for hygiene and to avoid mineral dust)
- Small screwdriver(Only if your unit has screws securing the housing)
- Mild dish soap or cleaner(For routine cleaning of mineral deposits (dilute and rinse thoroughly))
- Towel or tray(Catches drips during replacement)
Steps
Estimated time: 20-30 minutes
- 1
Power down and access the filter compartment
Unplug the unit and remove the water tank if needed. Open the filter compartment to expose the old filter. If there are screws, remove them carefully with a screwdriver and set them aside. This step prevents electrical hazards and ensures you can reach the filter without forcing parts.
Tip: Keep track of screws and small parts to avoid losing them. - 2
Remove the old filter
Gently pull the filter straight out to avoid tearing. If the filter is stiff from mineral buildup, use a damp cloth to loosen deposits before removing. Inspect the housing for residue and wipe it clean before proceeding.
Tip: Do not force the filter; a slightly loose fit can indicate improper seating. - 3
Inspect the filter housing
Check for cracks, rust, or stuck mineral deposits inside the housing. Wipe down any buildup with a damp cloth and allow it to dry completely. A dry, clean housing reduces the risk of mold and ensures a snug fit for the new filter.
Tip: If you see damage, stop and consult the manufacturer before continuing. - 4
Prepare the new filter
Remove packaging and inspect the new filter for any shipping damage. If there are orientation arrows, note them before installation. Gently shake or tap the filter to settle loose fibers (if applicable) and avoid crumbling when placing.
Tip: Double-check the model-fit label on the filter package. - 5
Install the new filter correctly
Insert the new filter, aligning any arrows or grooves with the housing. Ensure it sits flush and securely—no gaps around edges. If the filter has tabs, engage them with corresponding slots for a locked fit.
Tip: Take a moment to verify the filter cannot be pushed in at an angle. - 6
Reassemble the humidifier
Replace the housing cover, reattach any screws, and reconnect any hoses or clips. If you removed the water tank, fill it with clean water and ensure all seals are snug. Wipe away any water drips before powering on.
Tip: Inspect seals and gaskets for wear; replacements may be necessary over time. - 7
Reset the unit and run a test
Plug the unit back in and reset the filter indicator if your model has one. Run the humidifier on a low setting for several minutes to verify airflow and confirm there are no leaks. Listen for unusual sounds that might indicate misalignment.
Tip: Document the date of replacement for future maintenance. - 8
Check humidity and airflow
Observe the mist, leaving no excess moisture on surfaces. If the mist seems weak, recheck filter seating and ensure the pump is functioning. Proper airflow ensures the filter does its job without becoming saturated too quickly.
Tip: Use a hygrometer to monitor indoor humidity for accuracy. - 9
Maintain a replacement schedule
Create a simple plan to replace filters at your typical usage interval. Record dates and note any changes in humidity or mist quality. Regular maintenance helps prevent mineral buildup and keeps air quality high.
Tip: Set reminders on your phone or calendar to stay on track.
FAQ
What filter size do I need for my humidifier?
Check your model number or user manual for the exact filter size and type. If you’re unsure, bring the old filter to a store or contact the manufacturer for the precise match.
Check your model number and manual to confirm the exact filter size; if in doubt, bring the old filter to verify.
How often should I replace the filter?
Replacement frequency depends on usage, water quality, and environmental conditions. Most units benefit from a filter change every 1-3 months with regular monitoring for signs of buildup or reduced mist.
Typically every 1-3 months with usage; watch for residue or reduced mist.
Can I clean the old filter instead of replacing it?
Filters are designed for single use. Cleaning rarely restores full filtration efficiency and can leave minerals behind. Replacing the filter is the recommended approach.
Filters are usually single-use; replacing is the best option.
What if I install the filter backward?
A backward-installed filter can leak or fail to filter properly. Remove and reinstall the filter with the correct orientation according to arrows or labeling.
If installed backward, there can be leaks or reduced filtration—reinstall correctly.
Is it safe to run the humidifier without a filter?
No. Running without a filter can damage the unit and increase exposure to contaminants. Install the correct filter before use to maintain safety and performance.
Don’t run it without a filter; install the right one first.
What maintenance schedule should I follow?
Maintain a simple calendar for filter changes and housing cleanings. Start with monthly checks in high-use periods, then adjust based on mineral deposition and humidity levels.
Keep a regular replacement and cleaning schedule to maintain performance.
Watch Video
The Essentials
- Identify the correct filter for your model first.
- Prepare and clean the housing before installing the new filter.
- Install the filter with proper orientation and seating.
- Test the unit and reset maintenance indicators after installation.
- Schedule regular filter replacements to maintain air quality.